This might be the perfect Pi-hole setup!
With this new setup I have redundancy for my DNS as well as the simplest VPN setup ever. Now when I am on the go not only can I access my home network with ease I am also able to take advantage of the ad blocking of Pi-hole.
Here are the basic steps to get things setup. There are more configuration steps available for each installation. Please check their websites for full details before proceeding.
Step 1:
Install Pi-hole on two Raspberry Pis.
curl -sSL https://install.pi-hole.net | bashNote:
In the Pi-hole Admin page in Settings > DNS, make sure that Listen on all interfaces, permit all origins is selected.
Tailscale traffic comes in on the tailscale0 network interface, so this option is needed to allow your Pi-hole to respond to Tailscale-based DNS traffic. When using this option, make sure your Pi-hole is properly firewalled.
Step 2:
Install Orbital Sync on one of the Raspberry Pis. This can also be installed on a completely different device on your home network. I prefer to do that, but it should work from one of the Raspberry Pis. Install instructions can be found here.
Step 3:
Install Tailscale on both Raspberry Pis.
curl -fsSL https://tailscale.com/install.sh | shStep 4:
Enable IP forwarding on both Raspberry Pis.
echo 'net.ipv4.ip_forward = 1' | sudo tee -a /etc/sysctl.conf
echo 'net.ipv6.conf.all.forwarding = 1' | sudo tee -a /etc/sysctl.conf
sudo sysctl -p /etc/sysctl.conf
Step 5:
Start Tailscale on both Raspberry Pis.
sudo tailscale up --advertise-exit-node --advertise-routes=192.168.1.0/24 --accept-dns=false --accept-routes=trueStep 6:
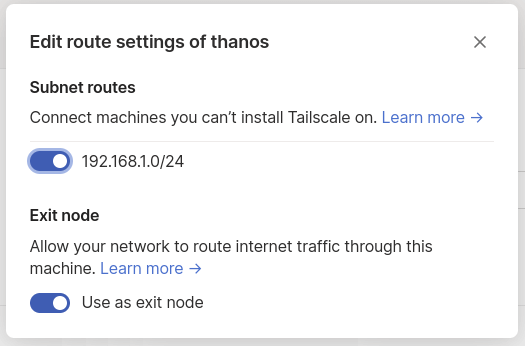
Login to Tailscale and click the "three dots" menu next to the Machine entry for each Pi-hole. Select "Disable key expiry" from the drop-down. Since the Pi-holes are not directly exposed to the internet it is safe to not require re-authentication. Then select "Edit route settings..." from the same drop-down menu and enable both options. See image below.
Next copy the Tailscale IP address for each Pi-hole and use them as the Global Nameservers on the DNS tab. Set them override local DNS. See image below.

Turn on MagicDNS on the DNS tab. This way the Pi-hole's interfaces will work when on or off the Tailscale network using their hostnames.
Step 7:
Configure your router to use the Pi-hole's local IP addresses for your DNS.
Step 8:
Install Tailscale on other devices such as your phone so you can connect to your Tailscale network.
Thats it!
Now you should have all your devices setup with ad blocking and VPN. Now when you are connected to your Tailscale network you will also get ad blocking even when you are not on your local network.
Don't forget if you want everyone on your home network (even without being on Tailscale) to be covered by Pi-hole to update your router's DNS configuration. Instructions can be found here.
Updates:
I have updated the instructions to use Orbital Sync instead of the now deprecated Gravity Sync.
*I have moved my Pi-hole install to an LXC running in Proxmox. So now I only have 1 Pi-hole running. I might eventually spin up another LXC container for redundancy.
*I have had issues with my DNS using the override local DNS option in Tailscale. I have disabled that for now to see if that helps.